CAGD-230
Digital Modeling - 230-3 - Fall 2017
Wrapping up the Semester (11/29/17-12/11/17)
Having been at a standstill for weeks, I finally looked down from the roof of Impa's house in-game and realized that, not only was the floorplan that I had been trying and failing to render as a rectangle, actually a square, the roof that I had been trying to modify from a round pancake was actually a square rotated forty-five degrees to the floor plan. I also found out that the gold emblem on the roof front was also on the roof back, meaning everything was actually just one corner modeled to perfection, then mirrored on the X-axis to form the rest of that wall, then everything mirrored on the Z-axis to form the other half of the building. Everything else from the doors and windows on the front wall was tweaks to the UV and extra models attached.
SouthWest Corner -mirrored on X -> Southern Half -mirrored on Z -> Whole Building... Cleanup and Differentiation...
I freaked out for several minutes, then scrapped almost everything I had done in Maya (just glad my Unity landscape was still quality) and started over. The wooden roof rack and the gold symbol shape were a good base to work from so I imported those to the new project.
Render 12/2


Render 12/6

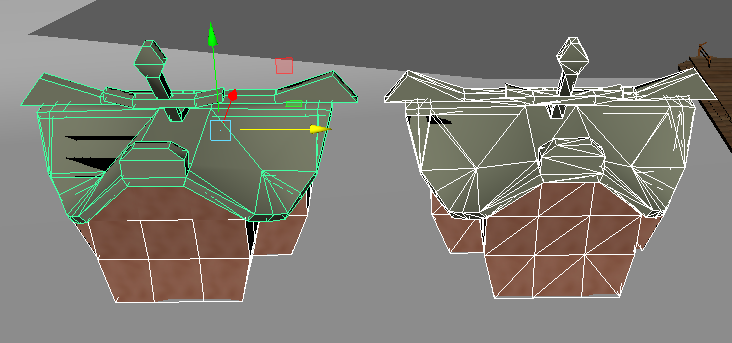
Close-up of Window With Inner Frame Bump Mapping and Polygonal Wood Outer Frame

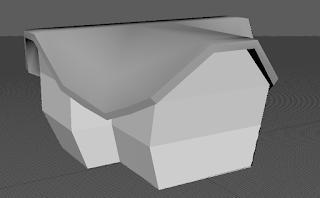
Weirdly Square Pancake Thatched Roof


Collecting the Pieces (11/15/17-11/29/17)
For Thanksgiving Break I purchased a Nintendo Switch and played until I reached the building I chose to model as well as the landscape. I was way off in my initial appraisal of the Terrain and will be modifying it appropriately. As usual I am lax in my ability to concentrate on modeling outside of class, so this was the build I had at the end of class on 11/27 - about five hours of additional work since the last screenshot.

Today I spent an hour composing everyone's images and importing them into the Unity file as well as sharing it with my teammates. William created his account properly, but Steven somehow failed to complete the process. I asked William to update his lamp texture to a white so it would appear properly lit as they were showing up dark in Unity in the newest version - he did so promptly which was very helpful.

Things going smoothly, just need to put in a lot of work this week to catch up to where I should be for the Final Build next Wednesday.
I had tried to make it to the point where I could show my teammates their buildings in game, but that turned out to be more hours of gameplay than I had to put in. I found out after class when I finally reached the area that Tarrey Town is initially empty of buildings - just the awesome and isolated plateau that drew us in from the beginning when we saw the youtube video of Link paragliding in back on the first day.
Building My House (11/8/17-11/15/17)
Finally managed to get a roof on the house I am happy with. It is still missing most of the ornamentation, but it is a decent start. Turns out that making a flat plane, warping it and then extruding it is the simplest way to lay something flat like a pancake so the folds hang downwards. This is still extremely behind but at least I am making progress. So far I have not done much more towards texturing and UVing. I spent roughly an hour before class on this current build.
I enjoy adding lamps as Unity Haloed Spotlights over imported Maya lamp structures - did so with my teammate's pieces when I composed and imported their most recent versions.

Diving into Unity and Maya Together (11/1/17-11/8/17)
Our group came together enough to upload our projects into Unity. No errors other than a windowframe texture and a hue being off in William's piece. Powell's project looks fun to climb around - however he apparently had not found the Google Drive shared folder until today. Oops. My house is still a block, given that I spent a long time getting the Tarrey Town canyon from Breath of the Wild modeled to a decent resolution. I really enjoy the terrain controls, setting and averaging stuff.
I have spent about six hours on this project. Things are coming together well, I am just having issues focusing on the modeling rather than gathering reference. The roof is a particular sticking point thanks to the weird curves and I have restarted several times.

Reference


Blogging as a Group (10/30/17-11/1/17)
The leader of our group from Monday did not show up on Wednesday due to illness. I am not exactly sure what we are doing. Steven Powell is very deep into modeling something with a fence. I figured out the xls to Google Sheet conversion (hopefully). I am working on scaling the Terrain in Unity to a decent size and adding the round canyon. Justin said our average wall panels should be 3 meters by 3 meters with the pivot in the lower right corner so working off a 300 x 300 unit scale per wall plane modular segment at start.
This project is modeling The Legend of Zelda: Breath of the Wild, as a series of buildings.


Diner Presentation (10/18-25/17)


Just failed to work consistently. Put in an average of five hours of work outside of class a week for a rough estimate of thirty hours total. Didn't recognize that the Renders were too dark compared to how they looked in the preview section of Maya until late in the process of submitting my work. It turned out to be my having failed to remove Cast Shadows from the floor geometry before running through the process... Oh well. Need to take better notes and allocate more time to a lot of things and polish.
Filling Space (10/11-18/17)
As I continue to fall behind in my modeling, the main thing I accomplished this week was four hours devoted to creating a smaller seat and reducing the polygon count on my barstool by trimming some awkward bits off the legs. This would've been easier to accomplish by editing the original curve as well as reframing and deleting excess edges and faces on the initial cylinder before duplicating and welding them into place to form the four legs. I discovered from a short tutorial that by 'deleting' rather than 'control-deleting' edges that this clean up had left a number of stray vertices scattered about leading to deformation inducing n-gons that also needed to be searched out and destroyed.
This week I plan on returning to the table and chair tutorials and producing something relevant and useful.
A small thing I was happy to have confirmed is that the SkyDome Light does not add to my rendering polycount limit.

My diner currently has:
Modeling a Diner (10/4-11/17)
This week was devoted to constructing UV Textures and populating the scene. Having found acceptable reference for the size of my diner, I was finally able to construct the room geometry to the appropriate metric scale. I also spent four hours outside of class on constructing a set of bar stools and a few more assembling reference material.
My favorite part of creating the bar stools was taking the top face off of a cylinder, pulling the edges in a bit using the extrude tool, shoving a slightly flattened beach ball inside and deleting all the bits that extend beyond the sides of the seat.
At current standing, my diner runs:


My goals include:


Blocking out a Diner (10/4/17)
As part of a major project, the class will be submitting daily milestones to our blog. In the course of creating a diner scene we will be stacking tables and chairs according to realistic dimensions. My choice of restaurant is focused around the Pei Wei Asian Diner chain as I am a fan of reds and dark woods and lantern-style hanging lights. This quick sketch of my scene in Maya consists of two walls, a staff door, a floor, a countertop and overhang, and eight dining sets of two 'chairs' and a 'table'.
This very simple layout was made in an hour. As the assignment was a blocked out scene with a face count in the thousands range - upper limit of 50k - with properly scaled legs attached to the tables and chairs... I will definitely be restarting this process by next week's deadline.
Stacking a Grocery Shelf (10/1-2/17)
After a series of tutorials involving texturing boxes and substances contained in clear jars with metal lids, we were turned loose on designing items and shelving for a small pantry. Once the jars were in place, making new ones was a simple matter of finding new textures and being absolutely certain the glass was not marked as 'opaque' so the contents would be visible. Most of my time spent setting up the scene was trying to eyeball the dimensions of lightly beveled rectangular polyhedrons so that they would match the painted textures of the flattened cereal boxes when unfolded.

As the beveling process results in sets of upper, center and lower edges and three interlocking triangles when they meet at corners, it was easy for me to lose track of location and order of the edges and vertexes when rescaling and moving the flattened Planar UV shell. I resolved to ensure my boxes had the correct scale in centimeters from the beginning, meaning I could only work from very well detailed blueprints.
I was fortunate enough to find the "Kellogg's WIC Eligible Cereals and Image Library" with eight styles and a large range of sizes. As the top and bottom sides are split into two faces, this required extra editing of the rig.


Assembling a Table and Chair (9/13-18/17)
While the tutorials provided for this assignment were straightforward, I failed to work on them outside of class time. We were supposed to reach a point where our textured objects were lit and shaded by multiple sources and where bump mapping was used to 'define' separate planks of wood inside of a solid polygon. I am fairly confident with how the individual legs turned out, but I fear I positioned them too far apart for the original dimensions of the tabletop.


Detailing a Pencil (9/5-11/17)
Following the digestion of several hours of tutorials, before and after Labor Day, some written by our teacher, Jennifer Underwood, we demonstrated our ability to create a pencil. We were provided most of the textures and the background display and asked to closely match the dimensions of a 2D image as if it were projected into 3D. While most of the initial modeling involved creating polygonal cylinders and cones, the crimped metal piece linking the eraser started out as a 2D curve drawn over the side of the reference photo and rotated around the center of the pencil's axis to produce a 3D shape.


Constructing with Primitives (8/23-30/17)
This assignment was designed to show off our grasp of the basic features of Maya Autodesk 2018, as well as check our ability to follow instructions for building scenes and procedures for submitting our work. Restricted to the simple solid structures with customizable dimensions and materials, we built a small outdoors area using references images we found on the web, assigning groups and parents as we went along and labeling our bookmarked camera views for ease of access by other people. Given the size and number of the files involved, we turned in our best final render to the Assignment page on Blackboard, then dragged folders containing our at least one reference, the render in question, and the scene exported as a Maya ASCII file, to the class' section of the Turn-In (T:/) Drive.


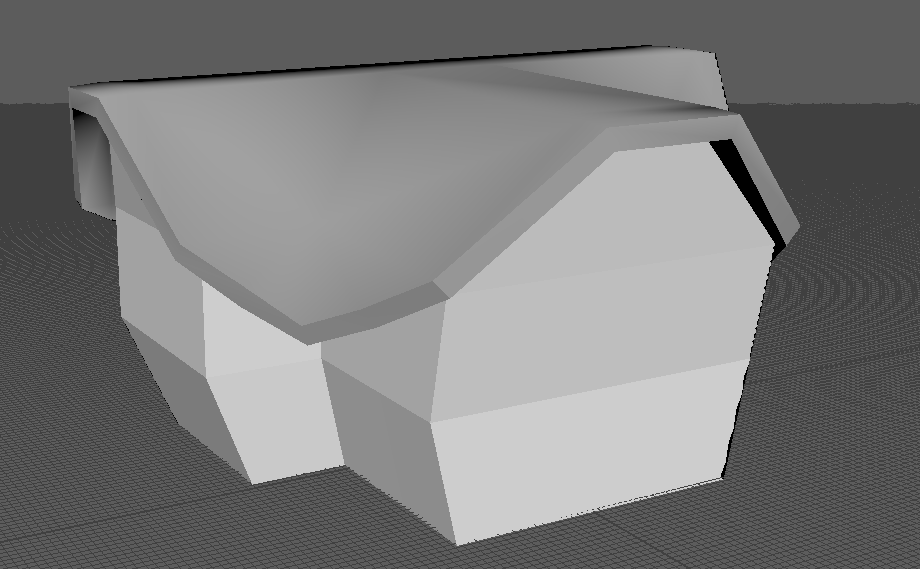
Wrapping up the Semester (11/29/17-12/11/17)
Having been at a standstill for weeks, I finally looked down from the roof of Impa's house in-game and realized that, not only was the floorplan that I had been trying and failing to render as a rectangle, actually a square, the roof that I had been trying to modify from a round pancake was actually a square rotated forty-five degrees to the floor plan. I also found out that the gold emblem on the roof front was also on the roof back, meaning everything was actually just one corner modeled to perfection, then mirrored on the X-axis to form the rest of that wall, then everything mirrored on the Z-axis to form the other half of the building. Everything else from the doors and windows on the front wall was tweaks to the UV and extra models attached.
SouthWest Corner -mirrored on X -> Southern Half -mirrored on Z -> Whole Building... Cleanup and Differentiation...
I freaked out for several minutes, then scrapped almost everything I had done in Maya (just glad my Unity landscape was still quality) and started over. The wooden roof rack and the gold symbol shape were a good base to work from so I imported those to the new project.
Render 12/2

Render 12/3

On Saturday I worked for eight hours, consistently using the Nintendo Switch to get my head wrapped around what I was modeling at the moment. Sunday I worked from 9am until 7am the next morning, with about eight hours of break, so about fourteen hours. I put in another three hours of work on modeling the inset upstairs windows and external lamps and two hours of work on Unity between then and the submission on Wednesday, so 27 hours in one week. I was relatively happy with how it turned out, but if I had purchased the game a month earlier I probably would've been able to raise the platform and fence with the gate and stairs down and added the red, white and blue wrappings, trimmings and banners. I'm terribly impressed with how some people can model things from a handful of screenshots with fixed angles but that is a level of skill I have yet to approach.
I constructed the first floor through 180 cm square panels as a decent door height size and then stacked an additional half-size panel above it for a total floor to outer ceiling height of 270 cm. Each side of the initially modeled southwest corner had four panels, one inset as seen from the south and two inset as seen from the west. I added a black border to base of the first floor's plaster texture so I could properly judge where to add the 'wooden' molding. I had more than enough Tri Count to build a proper frame for the walls and roof and windows rather than relying entirely on bump mapping - although the inner wood frame between the glass panes on the window was completely bump mapped. The UV Shell for the platform was made of four triangle sections taking in the long grain of the wood with the distinct diagonal border as was seen in-game.
Getting the right size square for the weirdly pancaked thatched roof was one of the most frustrating parts of construction as I kept feeling it was too huge for an overhanging structure basically no matter what I did. Once I had lowered the individual planes to the proper depth and selected the smooth function in Maya (being sure to manually reset the corner vertices to proper right angles) it looked instantly better... I'm not exactly sure why but it was a definite relief.
Monday, I came to class with my Nintendo Switch as I had finally reached Hateno Village where versions of William and Steven's buildings were waiting for an in-game construction crew to carry them to the currently empty plateau of Tarrey Town. They were able to climb around them a bit and make the paraglide trip down to the raised landscape, but this was all rather late in the process for more than minor corrections to their models.
As a group we forgot how to find Bump Depth under the bump2d1 section of Maya so our renders looked oddly dark at first although we were able to correct it under the much friendlier tabs of Unity engine. We had some last hour help from the Student Aides in correcting the issue, but this would've been resolved by taking better notes during lecture. My bump maps started out as the basic desaturated versions inverted from light to dark as the brighter areas are interpreted as raised textures. I then made some spot corrections on the eye symbol and the half of the window that I was mirroring as well as the handles there and on the door so they would have enhanced depth and pop.
Render 12/6

Close-up of Window With Inner Frame Bump Mapping and Polygonal Wood Outer Frame

Weirdly Square Pancake Thatched Roof

Final Texture and Bump Maps
Our team completely forgot to use the GGE Task Sheet after the first week and I do feel it may have helped to log hours worked and keep people on track. While I did not exactly spend weeks slacking off in class, there was frustratingly little to show in progress on my model which may have hurt group morale. While I encouraged the others to participate in the Unity Build that was pretty much limited to William moving and rotating structures ad keeping his .fbx import up to date so basically the rest of the scene and terrain was constructed locally by me.
I really enjoyed adding to the Unity scene a small pond with grass, the proper eight encircling trees with high enough boulders so you could jump to my roof from either side and the flooded forested area deep in the canyon. I used a spray on sand texture for the path and a rocky one for the hills which I also smoothed and raised so they were no longer flat tops. I was disappointed I couldn't figure out how to make the land bridge an overhanging arch using the Terrain controls - turns out the Unity Standard Assets come with grass, water and tree generators but not boulders so I couldn't simply bypass the Terrain Editor and build one wholesale out of weirdly stretched and stacked independent rocks...
Unfortunately, while Steven Powell had a build ready to go for the Group Scene screenshot due before class, he was working on his final textures and modeling until the last fifteen minutes and it barely made it into the Maya Quad and Tri Group Layout. I spent some time after class importing it in to the Unity project and fixing the Bump and Materials, so the corrected version without a door overlapping a window did make it into the screenshots for the presentation and the correct .ma file, even if it missed the grading deadline for the submitted .fbx and .pkg files.
Group Scene in Maya

Total Work Hours: 30-50
- Modeling That Was Discarded: About 20
- Modeling That Was Kept: About 16
- Textures: About 4
- UVing: About 5
- Unity Terrain: About 5
- Final Tri Count: 3594 of 5000
Project Summary
- Working for about two months on modeling shared scenes from one of three games
- Small teams cooperating through Maya, Photoshop, Unity and Google Drive
- Our inspiration was Zelda: Breath of the Wild - Tarrey Town and Kakariko Village
- Taking game references and sourcing the best free image textures to match
- Blocking out the buildings and terrain, then adding detailed geometry
- Simplifying planes and their UV Shells to stay within a 5000 triangle poly count
- Creating greyscale Bump Maps with consistent depth between applications
- Saving a duplicate building as a Combined Triangulated Structure for Group Screenshot
- Cleaning Vertex Errors and Deleting History in Maya for a fresh .fbx export to Unity
- Creating Lights with Halos in Unity and fixing them in place over the imported lamps
- Applying finishing touches such as grass, trees and water through Unity Terrain
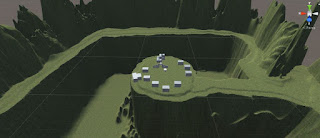
Tarrey Town Model

Overview of Unity-Built Terrain

My Presentation Triforce Logo

Collecting the Pieces (11/15/17-11/29/17)
For Thanksgiving Break I purchased a Nintendo Switch and played until I reached the building I chose to model as well as the landscape. I was way off in my initial appraisal of the Terrain and will be modifying it appropriately. As usual I am lax in my ability to concentrate on modeling outside of class, so this was the build I had at the end of class on 11/27 - about five hours of additional work since the last screenshot.
Render 11/27

Today I spent an hour composing everyone's images and importing them into the Unity file as well as sharing it with my teammates. William created his account properly, but Steven somehow failed to complete the process. I asked William to update his lamp texture to a white so it would appear properly lit as they were showing up dark in Unity in the newest version - he did so promptly which was very helpful.
My Buildings
I had tried to make it to the point where I could show my teammates their buildings in game, but that turned out to be more hours of gameplay than I had to put in. I found out after class when I finally reached the area that Tarrey Town is initially empty of buildings - just the awesome and isolated plateau that drew us in from the beginning when we saw the youtube video of Link paragliding in back on the first day.
Building My House (11/8/17-11/15/17)
Finally managed to get a roof on the house I am happy with. It is still missing most of the ornamentation, but it is a decent start. Turns out that making a flat plane, warping it and then extruding it is the simplest way to lay something flat like a pancake so the folds hang downwards. This is still extremely behind but at least I am making progress. So far I have not done much more towards texturing and UVing. I spent roughly an hour before class on this current build.
Current Render
I enjoy adding lamps as Unity Haloed Spotlights over imported Maya lamp structures - did so with my teammate's pieces when I composed and imported their most recent versions.
William French's Building Block Imported to Unity With My Halo Light and Terrain

Diving into Unity and Maya Together (11/1/17-11/8/17)
Our group came together enough to upload our projects into Unity. No errors other than a windowframe texture and a hue being off in William's piece. Powell's project looks fun to climb around - however he apparently had not found the Google Drive shared folder until today. Oops. My house is still a block, given that I spent a long time getting the Tarrey Town canyon from Breath of the Wild modeled to a decent resolution. I really enjoy the terrain controls, setting and averaging stuff.
I have spent about six hours on this project. Things are coming together well, I am just having issues focusing on the modeling rather than gathering reference. The roof is a particular sticking point thanks to the weird curves and I have restarted several times.
Landscape


Reference


Blogging as a Group (10/30/17-11/1/17)
The leader of our group from Monday did not show up on Wednesday due to illness. I am not exactly sure what we are doing. Steven Powell is very deep into modeling something with a fence. I figured out the xls to Google Sheet conversion (hopefully). I am working on scaling the Terrain in Unity to a decent size and adding the round canyon. Justin said our average wall panels should be 3 meters by 3 meters with the pivot in the lower right corner so working off a 300 x 300 unit scale per wall plane modular segment at start.
This project is modeling The Legend of Zelda: Breath of the Wild, as a series of buildings.
Landscape

Building

Diner Presentation (10/18-25/17)
Slideshow
Final Renders


Just failed to work consistently. Put in an average of five hours of work outside of class a week for a rough estimate of thirty hours total. Didn't recognize that the Renders were too dark compared to how they looked in the preview section of Maya until late in the process of submitting my work. It turned out to be my having failed to remove Cast Shadows from the floor geometry before running through the process... Oh well. Need to take better notes and allocate more time to a lot of things and polish.
Filling Space (10/11-18/17)
As I continue to fall behind in my modeling, the main thing I accomplished this week was four hours devoted to creating a smaller seat and reducing the polygon count on my barstool by trimming some awkward bits off the legs. This would've been easier to accomplish by editing the original curve as well as reframing and deleting excess edges and faces on the initial cylinder before duplicating and welding them into place to form the four legs. I discovered from a short tutorial that by 'deleting' rather than 'control-deleting' edges that this clean up had left a number of stray vertices scattered about leading to deformation inducing n-gons that also needed to be searched out and destroyed.
This week I plan on returning to the table and chair tutorials and producing something relevant and useful.
A small thing I was happy to have confirmed is that the SkyDome Light does not add to my rendering polycount limit.
Current Render

- 1 Building Geometry with several lights
- 1 Bar Stool
- 1 Short Stool
- 1 Counter
- 1 Overhang
Modeling a Diner (10/4-11/17)
This week was devoted to constructing UV Textures and populating the scene. Having found acceptable reference for the size of my diner, I was finally able to construct the room geometry to the appropriate metric scale. I also spent four hours outside of class on constructing a set of bar stools and a few more assembling reference material.
My favorite part of creating the bar stools was taking the top face off of a cylinder, pulling the edges in a bit using the extrude tool, shoving a slightly flattened beach ball inside and deleting all the bits that extend beyond the sides of the seat.
At current standing, my diner runs:
- 1 Building Geometry
- 6 Bar Stools
Current Render


My goals include:
- 1 Building Geometry
- 6 Bar Stools
- 2 Side Doors
- 1 Main Entrance
- 1 Countertop
- 1 Overhang
- 8 Standing Dining Sets -- 1 Table with 2 Chairs
- 4 Booths -- 2 Long Seats with Large Wooden Divider Backs, 1 Table with Wooden Divider Side
Pei Wei Asian Diner Chain Reference


New York Restaurants


Gochi


Blarch Innuendo Floor Plans


Blocking out a Diner (10/4/17)
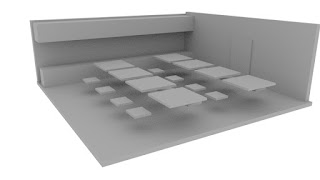
As part of a major project, the class will be submitting daily milestones to our blog. In the course of creating a diner scene we will be stacking tables and chairs according to realistic dimensions. My choice of restaurant is focused around the Pei Wei Asian Diner chain as I am a fan of reds and dark woods and lantern-style hanging lights. This quick sketch of my scene in Maya consists of two walls, a staff door, a floor, a countertop and overhang, and eight dining sets of two 'chairs' and a 'table'.
This very simple layout was made in an hour. As the assignment was a blocked out scene with a face count in the thousands range - upper limit of 50k - with properly scaled legs attached to the tables and chairs... I will definitely be restarting this process by next week's deadline.
Sketched Render

Stacking a Grocery Shelf (10/1-2/17)
After a series of tutorials involving texturing boxes and substances contained in clear jars with metal lids, we were turned loose on designing items and shelving for a small pantry. Once the jars were in place, making new ones was a simple matter of finding new textures and being absolutely certain the glass was not marked as 'opaque' so the contents would be visible. Most of my time spent setting up the scene was trying to eyeball the dimensions of lightly beveled rectangular polyhedrons so that they would match the painted textures of the flattened cereal boxes when unfolded.
Final Render

As the beveling process results in sets of upper, center and lower edges and three interlocking triangles when they meet at corners, it was easy for me to lose track of location and order of the edges and vertexes when rescaling and moving the flattened Planar UV shell. I resolved to ensure my boxes had the correct scale in centimeters from the beginning, meaning I could only work from very well detailed blueprints.
I was fortunate enough to find the "Kellogg's WIC Eligible Cereals and Image Library" with eight styles and a large range of sizes. As the top and bottom sides are split into two faces, this required extra editing of the rig.
Cereal Box Reference
Unfortunately my budgeted eight hours for sorting out the boxes came with an hour set aside for assembling the rest by the initial deadline. I sadly underestimated how long it would take me to import the jar object and render three new ones properly with different fills as well as shelf construction and layout, taking three hours in total, far into the depths of lecture.
Rendered at Start of Class

Assembling a Table and Chair (9/13-18/17)
While the tutorials provided for this assignment were straightforward, I failed to work on them outside of class time. We were supposed to reach a point where our textured objects were lit and shaded by multiple sources and where bump mapping was used to 'define' separate planks of wood inside of a solid polygon. I am fairly confident with how the individual legs turned out, but I fear I positioned them too far apart for the original dimensions of the tabletop.
Final Render Provided Blueprint


The first leg was constructed from a basic cubic polygon with the top face removed to save on processing power as the properly applied top would hide it from sight. The legs's Planar UV map was also split along the 'inner' long edge so that any errors in lining up the seams of the wrapped texture would generally be facing towards the inside of the table rather than the viewer. This was my first time experimenting with the Measurement tools and I may have misunderstood how the legs were meant to be positioned in relation to the locators. Given the time between now and when my table model is required for a group scene, I hope to have ironed out the difficulties and have a product more on-spec.
The completed chair will probably be based around a Kaustby one pulled from the pages of IKEA. I look forward to how the shadows will play out, as well as the challenge of incorporating the slight angle at the back.
Future Reference

Detailing a Pencil (9/5-11/17)
Following the digestion of several hours of tutorials, before and after Labor Day, some written by our teacher, Jennifer Underwood, we demonstrated our ability to create a pencil. We were provided most of the textures and the background display and asked to closely match the dimensions of a 2D image as if it were projected into 3D. While most of the initial modeling involved creating polygonal cylinders and cones, the crimped metal piece linking the eraser started out as a 2D curve drawn over the side of the reference photo and rotated around the center of the pencil's axis to produce a 3D shape.
Final Render

This was my first use of adjusting the temporary working folders rather than using the defaults and the Turn-In directory. I was unsure of how well the Maya Ascii archive would perform when opened on a different computer. After several false steps I learned in class that we needed to keep the workspace.mel document and import it to preserve links. Employing the Outliner Panel from the start greatly improved my consistency in grouping and naming.
Major Reference

I enjoyed how simple constructing the main body of the pencil was. Polygonal cylinders in Maya come with an slider for determining faces and can easily be reduced in detail to produce the correct hexagonal shape. A cone of the right length and width, positioned to slightly overhang the tip, was used as a template to remove all but the Boolean intersection of itself and the pencil body. This also resulted in the sharp and tapered point of the cone being sheared off, leaving a nicely blunt end for the graphite.
I wound up deleting and going through several iterations of lights before realizing that I had placed them on their own locked layer to prevent myself selecting them by accident and - unlike the backdrop - I had set the Layer to 'T' instead of the 'R' needed for them to Render and not leave the scene completely dark. I feel vaguely tone deaf with the specularity in terms of darkness, shading and reflection as I could tell the various sliders were affecting things but I could not decide what was objectively 'better'. The tutorial-proposed adjustments to the lights meant to increase the fuzziness of the shadow, such as angle height, appeared to affect nothing (either because the steps were meant for a previous version of Maya or my implementation was faulty), so I would like to seek clarification and further instruction for future projects.
The biggest surprise for me from this set of tutorials was that the Maya eye dropper used for setting material colors will stay active when pulled out of the application window, allowing for fast and easy collection of samples from the reference material. This method feels a lot more intuitive than estimation or copying and pasting hexadecimal codes.
This was completed in a five hour session to model the pencil and a four hour session to texture and pose it, with frequent reference to the tutorials. I believe I could build another pencil structure on my own within two hours knowing what I know now - experiments have me creating a six-sided cylinder with blunt and tapered end within ten minutes - but the methods for the texturing and bump mapping without constant reference seem yet to be beyond my reach.
Constructing with Primitives (8/23-30/17)
This assignment was designed to show off our grasp of the basic features of Maya Autodesk 2018, as well as check our ability to follow instructions for building scenes and procedures for submitting our work. Restricted to the simple solid structures with customizable dimensions and materials, we built a small outdoors area using references images we found on the web, assigning groups and parents as we went along and labeling our bookmarked camera views for ease of access by other people. Given the size and number of the files involved, we turned in our best final render to the Assignment page on Blackboard, then dragged folders containing our at least one reference, the render in question, and the scene exported as a Maya ASCII file, to the class' section of the Turn-In (T:/) Drive.
Final Render

The weakest part of my performance in the assignment was in the Hierarchy as we were supposed to label each component of the scene by object and group. I'm afraid I managed to misunderstand which sections of materials and meshes we were supposed to adjust for them to show proper names and iterations and I failed to allocate enough time to Rename most parts of the Resource Tree manually. I also failed to group the various trellis parts and hanging vines up and down the spectrum so they could either be moved as a whole or by type.
My brief attempt at assembling the scene once I had settled on the current piece of major reference and stopped obsessively restarting when faced with indecisiveness over the camera angle, scale and lighting, stands as underwhelming. Everything is rather thick and sparse, far from the lush growth of the reference material.
Major Reference
I am decently happy with the angle down the trellis that captures the small modeled vines and grape bunches as well as the few other objects I staged to the back and the sides. The small reflecting pool with steps was created as a desire to balance that side with the large overhanging tree as well as to capture what I had originally been going for when starting this assignment. Given more hours of work, I would probably increase the height of the trellis, thin the bars, massively increase the amount and detail of foliage and fruit, then experiment with successively higher camera angles to get the best use of the tunnel.


Comments
Post a Comment