CAGD-373
Game Asset Development - CAGD 373 - Spring 2019
After a good amount of work, we came together and created a slideshow and a presentation of the finished product.


Failing to have a cohesive idea for the texturing of the project, I defaulted to outlining the tower segments in blue glass, dirty and clean concrete as well as wood grain.


Game Scene Final 5/13/19
- Eight week project made with a team of three people (including myself)
- Created in Maya
- Textured in Substance Painter
- Assembled in Unity
- Shot in Open Broadcast Software
- Google Suite of YouTube, Blogger, Sheets and Drive used frequently throughout
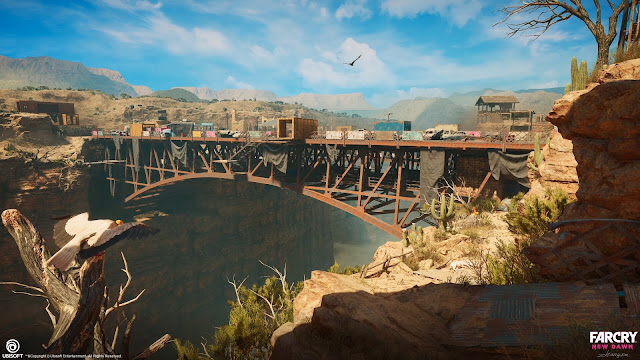
- Inspired by the Navajo Bridge (Grand Canyon) Expedition from Far Cry New Dawn

Promotional Art of Original Game
After a good amount of work, we came together and created a slideshow and a presentation of the finished product.
Here are the final textures, geometry and UVs for my portion of the project:


Substance Painter Finished Textures. High-Poly UV map showing the small cylinder Floater


Geometry of the Bridge with each part in rough location and again, centered at the origin


Texture Maps Exported From Substance Painter

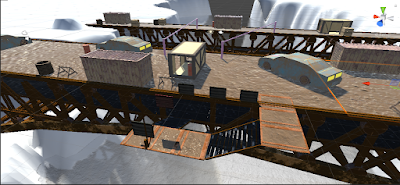
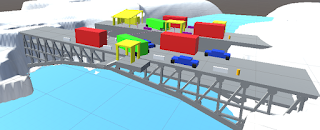
Completed Scene in Unity
My final tri count for the low-poly turned out to be 210. I'm unsure how many tris were cloned and used in the final scene but presumably a huge amount. Following a massive slowdown I removed the small crossbars seen in the middle of the rails from the small bridge as the player is not actually able to reach the inner level of it and removed most of the parts of the bridge hidden by Terrain. I also discovered that the prefab I had made of a quarter of the small bridge had an extra copy that was causing some major texture overlap (Oops). I also needed to switch the water quality from "Refractive" to "Reflective" as the processing power spent rendering the underwater parts of the bridge was prohibitive.


Car, Barrel, Tires, Collectibles - Jovanny; Crates, Wooden Structure, Shipping Container - Austin
After I finished the bridge assembly I scattered several of my teammates' objects around half-buried in dirt and adjusted the Terrain to make my staircases and such accessible, then exported the scene and filmed it in Open Broadcast Studio. I found a bug where there were two cameras filming in the scene which disabled the vertical rotation of the player's point of view so I disabled the extra one and enabled some post-production effects such as bloom and anti-aliasing.
In addition to the regrets I mentioned last week due to my bad time management skills this semester I need to add the lack of a third white sign to go with the pink and blue painted ones as there was enough room leftover in the UV map, but I was reluctant to return to the modeling stage this late in the process.
In addition to the regrets I mentioned last week due to my bad time management skills this semester I need to add the lack of a third white sign to go with the pink and blue painted ones as there was enough room leftover in the UV map, but I was reluctant to return to the modeling stage this late in the process.
Game Scene Weekly Progress #7 5/8/19
We worked overtime to get the bridges in place and modify the terrain so it matched the walkways as well as lay out the textured buildings and objects in a way that made sense.
I finalized the textures and made the staircase by taking my quarter dirt walkway and layering it over the flattened metal wall so the ridges showed through. To help add detail to these walls I borrowed a metal bar object from my teammate Austin's shipping crate. I also laid double lines down the center of the 'road' and acquired the help of the teacher's aide in stopping the shiny reflective nature of the dirt and the matte black of the metal walkway. The solution was separating my main material into shiny and dull versions with different settings on reflections and roughness and apply to the different objects as needed. Unfortunately I lost my main screenshots for this day as copying and pasting them directly from Screen Grab to Google Blogger rather than saving them to the desktop and importing them causes a major error.
As I was suffering a backlog of work on the bridge, my teammate Jovanny stepped up and made the code for the collectables and win condition that I had originally volunteered to do. Unfortunately the final work on the ziplines we'd had in the scene from day one fell through and they needed to be deleted.


Bridge Parts by Me, Steel Bars by Austin, Reference Screenshot of Far Cry New Dawn
Game Scene Weekly Progress #6 5/1/19
Following our successful revision of the Unity project, we were able to see the scene with proper water through the viewpoint of a first-person character. Unfortunately this revealed an error where a large section of terrain would go transparent when looked at from several angles, which is in the process of being fixed.


Production on the UVing has led me to rework several of the low-poly textures. I am currently adding ridges to the train car wall section and crossbars to the railing, with various rivets being applied as high-poly floaters.
Game Scene Weekly Progress #5 4/24/19
Worked out proportions for small bridge and inner railing and supports. Started piecing out stairways. Our Unity project was accidentally saved under the wrong version, so we are in the process of rolling it back.
Was informed texturing would probably be a lot easier if I didn't try
to merge each portion of the bridge but left the straight supports,
connecting cylinders and arches as separate pieces. Seems
straightforward enough so am going to render the existing bridge
construction transparent, export to Unity and use it as blueprint for
assembling pieces in-engine.

Game Scene Weekly Progress #4 4/17/19
Stalled out on progress this week due to being sick and unexpected home repair. Continued work on fleshing out the larger bridge, acquiring reference shots and starting the railing pieces and holders that run the length of both bridges.


Game Scene Weekly Progress #3 4/10/19
Myself and two teammates are modeling a scene in Far Cry: New Dawn for our end of semester. I am in the process of constructing the poly model for the two spans of the Grand Canyon's Navajo Bridge and assorted staircases. I feel that I'm lagging behind my teammates as they're already on to the texturing stage of several of their pieces, so I hope to put more hours in next week.
The first week I did a mock-up of the terrain and bridge in Unity. This week I focused on doing a quarter of the larger bridge that can be flipped and turned to assemble the full bridge. I think that we only need to count the poly count for the quarter exported from Maya and UV'd in Substance Painter rather than the fully assembled construction in Maya but I am not exactly sure. The current tri count for the one-eighth of the railing is 1208 and 240 for the one-quarter of the walkways, which adds up to 10608 for the fully assembled longest bridge and I've yet to add the rails underneath or the walkway supports.

The first week I did a mock-up of the terrain and bridge in Unity. This week I focused on doing a quarter of the larger bridge that can be flipped and turned to assemble the full bridge. I think that we only need to count the poly count for the quarter exported from Maya and UV'd in Substance Painter rather than the fully assembled construction in Maya but I am not exactly sure. The current tri count for the one-eighth of the railing is 1208 and 240 for the one-quarter of the walkways, which adds up to 10608 for the fully assembled longest bridge and I've yet to add the rails underneath or the walkway supports.

Week Two: Unity Mock-up by Warren
 Week Two: Austin's Annotated Map
 Week Three: Jovanny's Blocking Out Of The Scene
Week Three: Warren's Expanded Bridge

Week Three: Warren's Quarter-Walkway, Eighth-Railing


On my first pass through, I set the thickness of the bridges to the real life Navajo Bridge's Wikipedia page and eyeballed the width and height to a percentage of the span as Far Cry: New Dawn appeared to have condensed it for the game. Following feedback from my teammates who said that the bridges were too short to accommodate Austin's annotated map I expanded the width of the larger bridge and increased the height so the arch would have a more visible curve. The smaller bridge is constructed somewhat differently and I may need more reference shots before proceeding further.

Week Three: Warren's Expanded Bridge

Week Three: Warren's Quarter-Walkway, Eighth-Railing
Mobile Tower Segments 3/15/19
This week was focused on three designing towers for a mobile audience so two of them had to match the first one from the neck down, no single one could be above a 1500 tri poly count or have parts outside a 1x2x1 rectangular area. The resolution map was also scaled down to a 512x512 map.


Reference Images (From Left to Right)
After creating a classic rook tower base in Maya, I modified a cone with a sphere for a Sauron-type eye and stacked several diamonds crossways, threw up a halo and added some supports down to the base. As I was working with many different NURBS primitives and doing Boolean unions and differences, it took a long time to wrangle down the vertices and edges so the UV shells would be manageable. This took the main bulk of the project time, before I had something I was ready to export to Substance Painter.

ID Maps for Tower Segments and Reference Block Wireframe
Failing to have a cohesive idea for the texturing of the project, I defaulted to outlining the tower segments in blue glass, dirty and clean concrete as well as wood grain.


Material shown in Substance Painter and wrapped around models in Unity
I found that constructing an ID map in Maya by assigning materials to
specific faces of an object meant that the normal methods I had of
adding depth to an object would break the ID map and start assigning
colors randomly to nearby faces as vertices are added and subtracted. I
came to the compromise of adding Divisions and then Beveling the result
for a certain level of depth that still had some smears of extra
texture on the wrong places. Had I planned enough time for this step, I
would've liked to have brushed these areas with the correct texture in
Substance Painter, or separated out the ID map segments into entirely
different objects in Maya and added more depth with less texture
bleeding.
This was my first time experimenting with the environmental lighting in Substance Painter and I notice that I somehow managed to give the concrete a high gloss when I exported it to Unity... Here are some 45 degree turn-arounds of the three tower models, alongside the exported base color map for each unique section.
This was my first time experimenting with the environmental lighting in Substance Painter and I notice that I somehow managed to give the concrete a high gloss when I exported it to Unity... Here are some 45 degree turn-arounds of the three tower models, alongside the exported base color map for each unique section.


The final tri poly counts were 532 for the base, 446 for the eye topper
and 708 for the stack of diamonds. Having an additional 260 tris
headroom for the diamond topper and 356 for the eye tower means that I
could easily come through and add more details in the future, or even
expand the base by adding segments for banners or windows and doorways. Beyond adding a few sprays of color with a brush, I mainly relied on the broad stroke texture settings of Substance Painter. I would like to revisit this project in the future as I believe I would enjoy drawing within the 512x512 confines of the base color map and seeing what I could accomplish under those restrictions.
Sci Fi Modular Hallway 3/6/19
This was the first assignment this semester that emphasized creativity rather than our ability to follow tutorials as we were required to design a modular system of hallways from scratch using Maya and Surface Painter, then display a thirty second Open Broadcast Studio video walkthrough of an assembled scene in Unity.
After researching how modular hallways are generally constructed I decided to reach the needed amount of unique segments by creating a straightforward hallway (one ceiling, one wall, one floor) and a descending tunnel system (one ceiling, two walls, one floor). This was balanced out with two turns, two trim pieces and a 'door' to mark off dead-ends.


Reference Images (From Left to Right)
For convenience in exporting to Surface Painter and Unity, as well as to demonstrate our understanding of Maya's Outliner Panel, we were asked to duplicate our initial modular set into five groups with various settings and tweaks applied.
- Complete - The hallway segments assembled into a demo structure
- Low Poly Game Export: Quads - The mass of segments overlapping to form a rough cube
- Low Poly Game Export: Tris - The previous cube Triangulated for better export to Unity
- Low Poly - The segments spread out and rotated so their working faces are visible from directly above
- High Poly - The previous group beveled to taste, color-coded and adorned with small meshes called 'floaters'
Unfortunately, due to some psych and lifestyle issues, I found myself starting the project basically from scratch the night before it was due. A seven-hour cram session later, with an hour the next morning to polish things up, saw me beveling the fifth group, but short of color-coding it so I could easily tell areas apart in Surface Painter or creating the 3D 'floaters' that would be baked onto the normal maps of the low poly meshes.

Layout of Unadorned High-Poly Segments (On Time)
The class as a whole was given a fifteen hour extension on the submission of the ePortfolio blog post, so I took some time to try and run through the remainder of the assignment. This led me to realizing I had been inconsistent in my object naming and that I'd averaged the normals on the entire set rather than by each piece separately creating some random errors that took me awhile to track down. The tutorial also informed me that I needed to combine the floaters into the objects they rest on. Eventually, I had a basic mesh map I was happy with.

First Successful Bake Of Hallway (Late)
In short order I was able to apply a main smart material metal, a generator for a mask that interspersed it with another metal and an emissive layer that caused my floaters to light up. In the future I would like to vary the color ID attached to the floaters so that more parts will remain dark.

First Test of Emissive Light On Steel Material (Late)
This is the point of the Tutorial Series where I would need to create my set of five alphas and/or normal maps and paint them on before exporting to Unity. However, I have reached the end of the deadline for this blog post, so I will be moving on to the currently due homework. I am interested in finishing this assignment and, at the very least, plan to dive into the Unity assembly and video tour over Spring Break.


Comments
Post a Comment